Thursday, December 30, 2010

Window Restoration

Original Windows

As a landmarked property, we were required to keep the windows in the old house.  This meant having to completely restore the frames and re-glaze the panes.  This was a painstaking process that included removing layers of paint, filling cracked and damaged wood and reproducing missing pieces.

Removing Layers of Paint

Jack at Work on the Windows

Care was taken when removing the old paint that was most likely lead-based.  Scraping and sanding was a time-consuming process.

Masks Required

Roof Deck Takes Shape

The rooftop deck will be a private area not visible from the street. Facing southwest, we’ll have a view of the Flatirons through the treetops.

The rooftop deck is not large, but we were able to incorporate a fabulous fireplace. We selected the Regency Horizon HZO42 outdoor gas fireplace. It is a sleek, low-profile fireplace that does not obstruct views and will provide the ambiance we were looking for.

Roof Deck Tucked Behind the House

Fireplace Framing Begins

Regency Horizon HZO42 Firebox

One can never have enough storage and we made it a priority to take advantage of any available space.  the area under the eves was commissioned for storage purposes and access to this area from the rooftop deck makes it perfect for storing patio furniture in the winter months.

Storage Off Roof Deck

Wednesday, December 29, 2010

Interior Walls

The rooms took shape with interior walls put in place.  Particularly exciting was the addition of the staircase that appears to float in the stairwell.  The stairs are supported by steel that is encased in the framing.
 
Staircase Under Construction

Upstairs, the office alcove overlooks the stairwell with angled ceilings and access to the rooftop deck.

Office Alcove

The fretwork that was salvaged from the old part of the house will be installed opposite the stairs on the wall adjoining the master bathroom water closet bringing natural light into that room.

Framing for Fretwork Transom

View to Master Bedroom

Downstairs, the fireplace in the great room has been framed.  It will be flanked on both sides with cabinetry.

Great Room Fireplace

Sistering

Now that the floor of the old house has been bolstered with additional support piers, its joists reinforced and the space beneath it insulated, work began on the walls.  Like the rest of the house, the timbers used to erect the walls were rough and random.  In order to strengthen the perimeter walls of the house a technique known as “sistering” was used.  A new stud was attached to each and every original stud, fortifying the walls – and increasing our lumber budget!

Stabilizing the Walls

Sunday, December 26, 2010

Plumbing Rough-In

The plumbing rough-in began about the same time as the sheet metal duct work began.  The house was buzzing with activity.  Copper pipe was used throughout the house for all water delivery.

Getting Busy with Modesty


Chris Working in West Bath Shower


Plumbing in Main Floor Baths

Insulating the Crawl Space

It gets cold in Boulder, Colorado and the city is quite focused on insuring that new projects meet stringent energy efficiency guidelines.  Take a look at the first phase of insulation – the crawl space.  This house will be tight.  The house will be warm in the winter and cool in summer.

Blowing in Insulation
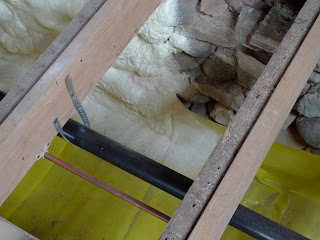
A foam insulation is used to line the walls of the crawlspace beneath the old section of the house.  The foam expands and creates an air tight barrier along the original stone foundation and around the support beams that were added to support the floor.

Foam Insulation and Sheeting
Beneath the foam is a special heavy vinyl sheeting that further seals the area and prevents moisture from entering the crawlspace.

Saturday, October 9, 2010

Up on the Roof

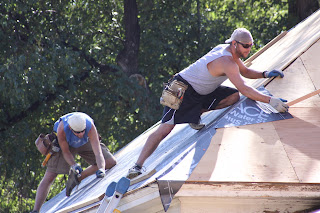
While I am busy selecting the color of the asphalt shingles, the crew is busy weatherproofing the roof. 
First Layer Goes On the Roof

As soon as they  finish, the masons begin to rebuild the chimney.  It was a busy few days up on the roof.
The New Chimney will be Level!

Thursday, October 7, 2010

Porch

We were asked to keep the front porch. After all, it is original to the house. No problem. It’s a little uneven. We’ll have to fix that. Surprise … surprise! What did we find? Rotted wood and an unsteady foundation.


The Original Porch was Falling Apart

What was Holding Up the Porch

Nothing Worth Keeping

Starting from the bottom up, the rotted wood porch was demolished along with the wobbly brick supporting it. New brick piers were built. The concrete stairs to the porch remain. They will eventually be faced with flagstone salvaged from the property and a new Brazilian redwood floor will be built.


The Old Porch was Removed

All that Remains

New Brick Piers

Original Concrete Steps Remain

Monday, September 27, 2010

Roofing 101

With the steel beam and rafters in place, Nick and his crew began putting the plywood sheathing on the roof and erecting the interior walls.  There are many angles to the roof and putting it all together is no small feat.  We are lucky to have such amazing framers.  These guys really know what they are doing and the quality of their work is outstanding.  We couldn’t be happier.
Plywood Caps Our New Roof


Loft-like Angles on the Second Floor Ceiling

Nick, King of the Framers

Initially, we were not going to replace the roof on the old part of the house since it had been reroofed just a few years ago.  We changed our mind and are now glad that we made the decision.  What we found under the asphalt shingles were wood shingles nailed onto random slats of wood.
Dan Tearing Off the Old Roof


Beneath the Shingles


Adding More Support

In the last picture, you can see that additional support beams have been provided where there were none.  Remodeling an old house is much more complex than we had imagined.  The old adage, “they don’t build ‘em like that anymore” is probably a good thing!

Sunday, September 19, 2010

Beam Me Up

Second floor construction began with exterior walls going up.  The house is beginning to take shape.  Now we can begin to see how the new addition will tie to the original structure.  It’s a beautiful day in Boulder and the crew is busy preparing for delivery of a massive steel beam that will support the new roof.

Walls Going Up on the Second Level

Tying Together the Old with the New

Street View of the Second Story

The master bedroom will be located on the second floor along with a bath and an office alcove.

Doors to a Deck, the Office Alcove and Stairwell

Looking Toward the Master Bedroom

Wow.  That is a big beam.  The framers commented that the house is constructed like a commercial building.  I guess we won’t have to worry about those 100 mph winds Boulder occasionally experiences.

The Beam Arrives

Beam Placement

Why We Wear Hard Hats!

With the beam in place, the remainder of the roof is constructed and walls can start going up.

The Beam is Secured in Place

The Beam Runs the Length of the Master Bedroom

Thursday, September 9, 2010

Basement

Not much to see in the basement. It exists only under the new addition so it’s not very large. We feel fortunate to have a basement and the space to accommodate a media room and a bathroom, a workroom, and a mechanical room.

High Ceilings Make the Space Seem Larger

Windowless, the media room will be a cozy spot to watch movies. We’ll have plenty of room for sectional seating and a nice 9‘ wall for a television.  Hmmm, how large of a TV could we fit on that wall?

The Media Room

The window well with double windows provide lots of light in this room and the mechanical room opposite will give us storage space for bulky items.

Workroom Window Well

Tuesday, September 7, 2010

Putting Up Walls

It might look like pick-up-sticks from this perspective, but framing has begun and the house is taking shape. The floor over the basement is in place and the exterior walls are about to go up.

Floor Over the Basement and Historic House

Let’s do this the right way – let me take you through the front door and introduce you to the floor plan. As you enter through the front door, you step into the ‘great room’. We’ll have our kitchen off to the left with a large island and a dining area. Straight ahead will be a fireplace and seating area centered around the double windows that were once part of the old dining room.

Entering the House

The Great Room

I am particularly excited about the insulation. The house had no insulation. Can you imagine living in a house with no insulation and a stove for heat? That’s the way it was ‘back in the day’. Of course, there was a gas furnace installed at some point in time; however, it’s not too efficient without insulation. This blown-in insulation in the crawlspace will help keep our heating costs under control.

Blown in Insulation Under the Floorboards

There is a hallway at the far end of the room that leads to the bedrooms, laundry, stairs to the upper and lower levels, and ultimately to the garage. The original house sits high on its foundation and the new addition is at a lower grade. Three steps down takes you to the new wing.

Entering the New Wing

The east bedroom is the guest bedroom.  It's small – very small – but I like to refer to this room as the “room with a view”. Just outside the double windows is a petite tree and beautiful lilac bushes. This is the area of the yard where we will plant a garden.

The Room with a View

Just opposite the east bedroom is a bath and just down the hall is the west bedroom. This bedroom has lots of windows and an attached bath.

The West Bedroom

At the end of the hallway is the laundry room/mud room. It will also accommodate the furnace and provide much-needed storage space.  The area under the washer and dryer is recessed and will include a drain.  We are hoping we will never experience a water leak; but if it happens, we are prepared!

Recessed Pan for Washer/Dryer

Looking back, you can see the elevation difference between the old and new sections of the house. 

View from the Garage Door to the Front of the House

And finally, this is the compact, single-car garage. Did you notice how clean the job site is? Meticulous!!

The Single Car Garage